前言
上一篇讲解并实践了百度地图基本显示,地图类型,实时交通图,热力图,地图控制和手势控制,今天看下在地图上添加view和覆盖物。
地图Logo不允许遮挡,可通过mBaiduMap.setPadding(paddingLeft, paddingTop, paddingRight, paddingBottom);方法可以设置地图边界区域,来避免UI遮挡。
其中参数paddingLeft、paddingTop、paddingRight、paddingBottom参数表示距离屏幕边框的左、上、右、下边距的距离,单位为屏幕坐标的像素密度。
—————–>利用这个来添加自定义的内容
- 标注覆盖物
- 几何图形覆盖物
- 文字覆盖物
- 弹出窗覆盖物
内容
地图上添加View
由于地图的Logo不允许被遮挡,百度自然会想办法针对一些开发者场景作出自己的调整,比如上面所说的setPadding()或者setViewPadding()一样好使,具体的使用分为两步:
第一步,
1
| mBaiduMap.setPadding(0, 0, 0, 200);
|
第二步,
1
2
3
4
5
6
7
8
9
10
11
12
| private void addView() {
TextView textView = new TextView(this);
textView.setText("这是用户自定义的View,这个时候logo和底部的一些内容会向上移动,因为MapView设置了底部Padding");
textView.setBackgroundResource(R.color.colorPrimary);
MapViewLayoutParams.Builder builder = new MapViewLayoutParams.Builder();
builder.layoutMode(MapViewLayoutParams.ELayoutMode.absoluteMode);
builder.width(bmapView.getWidth());
builder.height(200);
builder.point(new Point(0, bmapView.getHeight()));
builder.align(MapViewLayoutParams.ALIGN_LEFT, MapViewLayoutParams.ALIGN_BOTTOM);
bmapView.addView(textView, builder.build());
}
|
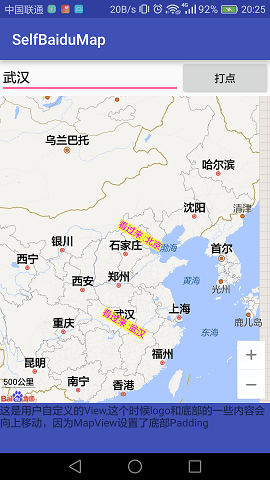
这样子就在底部添加了一个TextView,当然想添加其他的View自然也是可行的,具体效果图往下看。
地理编码,标注覆盖物和弹出窗覆盖物
利用标注覆盖物在地图上的特定位置添加标注,然后给标注覆盖物设置点击监听展示弹出覆盖物
1
2
3
4
5
6
7
8
9
10
11
12
13
14
15
16
17
18
19
20
21
22
23
24
25
26
27
28
29
30
31
32
33
34
35
36
37
38
39
40
41
42
43
44
45
46
47
48
49
50
51
52
53
54
55
56
57
58
59
60
61
62
63
64
65
66
67
68
69
70
71
|
private void addPointByEditText() {
String placename = etPoint.getText().toString();
final GeoCoder geo = GeoCoder.newInstance();
geo.setOnGetGeoCodeResultListener(new OnGetGeoCoderResultListener() {
@Override
public void onGetGeoCodeResult(GeoCodeResult geoCodeResult) {
if (geoCodeResult.getLocation() != null) {
addMarker(geoCodeResult.getLocation() , geoCodeResult.getAddress());
} else {
Toast.makeText(MainActivity.this, " No Result of GeoCoder! Sorry", Toast.LENGTH_SHORT).show();
}
}
@Override
public void onGetReverseGeoCodeResult(ReverseGeoCodeResult reverseGeoCodeResult) {
}
});
geo.geocode(new GeoCodeOption().address(placename).city(placename));
}
......
private void addMarker(LatLng point, String address) {
Bundle bundle = new Bundle();
bundle.putParcelable("LATLNG", point);
bundle.putString("ADDRESS", address);
OverlayOptions option = new MarkerOptions()
.position(point)
.icon(bitmap).extraInfo(bundle);
mBaiduMap.addOverlay(option);
}
mBaiduMap.setOnMarkerClickListener(new BaiduMap.OnMarkerClickListener() {
@Override
public boolean onMarkerClick(Marker marker) {
if (marker.getExtraInfo() != null) {
LatLng point = marker.getExtraInfo().getParcelable("LATLNG");
String address = marker.getExtraInfo().getString("ADDRESS");
addPop(point, address);
}
return false;
}
});
......
private void addPop(LatLng point, String message) {
Button button = new Button(getApplicationContext());
button.setBackgroundResource(R.drawable.marker_info_bg);
button.setTextColor(Color.WHITE);
button.setText(message);
InfoWindow mInfoWindow = new InfoWindow(button, point, -47);
mBaiduMap.showInfoWindow(mInfoWindow);
}
|
实际效果图:

文字覆盖物
文字覆盖物主要就是在地图上添加一些字串, 用上面的代码,将标注覆盖物改成文字覆盖物
1
2
3
4
5
6
7
8
9
10
11
12
13
14
|
private void addText(LatLng point, String message) {
OverlayOptions textOption = new TextOptions()
.bgColor(0xAAFFFF00)
.fontSize(35)
.fontColor(0xFFFF00FF)
.text(message)
.rotate(-30)
.position(point);
mBaiduMap.addOverlay(textOption);
}
|
实际效果图:
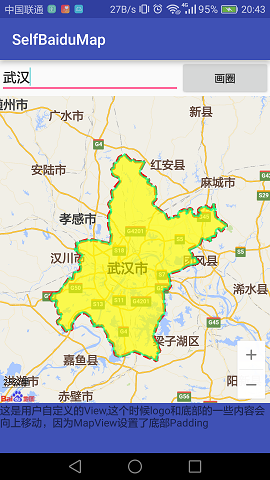
行政区边界搜索和多边形覆盖物
利用DistrictSearch和PolyOverlay,实现圈出行政区域的效果
1
2
3
4
5
6
7
8
9
10
11
12
13
14
15
16
17
18
19
20
21
22
23
24
25
26
27
28
29
30
31
32
33
34
| mDistrictSearch = DistrictSearch.newInstance();
......
private void addPoly(String cityname) {
DistrictSearchOption option = new DistrictSearchOption().cityName(cityname).districtName(cityname);
mDistrictSearch.setOnDistrictSearchListener(new OnGetDistricSearchResultListener() {
@Override
public void onGetDistrictResult(DistrictResult districtResult) {
if (districtResult.error == SearchResult.ERRORNO.NO_ERROR) {
List<List<LatLng>> pointsList = districtResult.getPolylines();
if (pointsList == null) return;
LatLngBounds.Builder builder = new LatLngBounds.Builder();
for (List<LatLng> polyline : pointsList) {
OverlayOptions ooPolyline11 = new PolylineOptions().width(10)
.points(polyline).dottedLine(true).color(Color.RED);
mBaiduMap.addOverlay(ooPolyline11);
OverlayOptions ooPolygon = new PolygonOptions().points(polyline)
.stroke(new Stroke(5, 0xAA00FF88)).fillColor(0xAAFFFF00);
mBaiduMap.addOverlay(ooPolygon);
for (LatLng latLng : polyline) {
builder.include(latLng);
}
}
}
}
});
mDistrictSearch.searchDistrict(option);
}
|
实际效果图:
备注
今天先看到这里,有时间接着跟~